How AI-Art Could Inspire Portrait Photography
- Michael Stapfer
- 12. Okt. 2022
- 5 Min. Lesezeit
Use Case V - Modifying the Background of a Portrait Shot

Sometimes it is not possible to photograph a portrait scene in only one shot: for example, the background may be disturbed by parking cars, or the exposure of the background needs much more time than the model in the foreground. Also, a flash modifier that has to be positioned very close to the model must be retouched from the image in post - that's why we need an image of the mere background without any objects or equipment to replace disturbing objects as a substitute background layer in the edit. This applies also to a group shot, when different persons are photographed separately with the same camera setting and camera position (tripod), but each with a different lighting setting and position. One example for this application is the combination of multiple shots and background by the photographer Joel Grimes:

© Joel Grimes
In all the above mentioned situations every photograph has to be taken with the same camera/lens setting and from the same position (perspective) on a tripod. As the background gets treated separately from the foreground, the option is revealed to manipulate the background and create a new scenery. Doing so, it is possible to let the scene play e.g. in another place without having to travel there or build an expensive stage set for the shooting. Movie makers often use the green screen method to exchange the background.
The idea presented here is different from the green screen technique. We want to reuse those parts of the background that are near to the camera. In a portrait shot with open aperture, it is the zone near the model that is sharp and that zone is what we want to sustain from the original background photo. Therefore, it matches with the foreground and the model doesn't have to be cut-out from its backgound. But the areas that are more distant to the camera and shall fall into a shallow depth of field can be replaced by another background.
Now, what is the difference between using an AI-art generated background and a photograph of e.g. a stock agency? The AI generated image content that will be painted into the distant background zone has two advantages compared to a given photo:
it is created by prompting, i.e. an individual and experimental textual description
it is unique and not existing in reality, it is not copyright protected
and most important of all: the AI uses the information about lighting and perspective of the sustained parts of the background scene and adapts the new content to it in terms of perspective, lighting and required content. It is difficult instead, to find a real photograph that matches all those requirements.
In the future, the AI-art generated images will for sure come with higher resolution and more detailed rendering. But for portrait shots with bokeh a detailed rendering is less important and therefore the AI-art generated modification of the background is a perfect use case for this kind of portrait or editorial photography and shall be demonstrated by an examples below.
Step 1: Prepare the Original Background Shot for Import to Dall-E 2
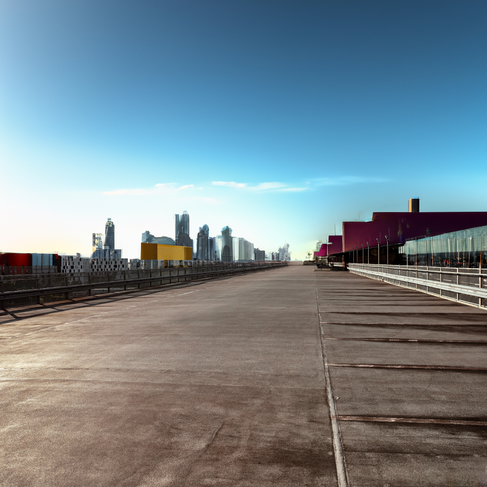
During one of my location scoutings I once made a photo of a roof parking in the North of Munich on a September afternoon that I planned to revisit for a photo shooting with friends. The sun was already getting low and brought a warm light from the left side into the scene.

For the new background, I want to keep all the asphalt ground to easily blend it with the portrait shot (to be taken from the same position). As the shooting actually didn't take place up to now, we assume it would have and we would have gained some good portrait shots too. But for demonstration of manipulating the background with help of Dall-E 2 in post, integration the portrait shot is not subject of this demonstration as it is a later stage of the work.
For drawing new content into the picture, we have to erase all distant areas that shall be modified by Dall-E 2 and save the image with the erased zones with transparent alpha channel in file format png. I use Serif Affinity Photo for that.

Now the image is ready for import to Dall-E 2.
Step 2: Let Dall-E 2 Out-paint new Content to the Background Image
The new scenery should play in a desert-like surrounding at golden hour. The prompt is:
"DSLR photo of outdoor roof parking deck in the Sahara desert with city skyline from oriental inspired architecture, sand dunes, photograph at golden hour, f/22, 24mm, make all elements sharp, for high quality editorial magazine"
The images above are four selected images that have also been edited (lighting, colours, gradients etc.). For the next step we will choose the first picture with a rather neutral sky and some newly introduced perspective lines on the upper right side.
Step 3: Add a Shallow Depth of Field to the Background Image
As mentioned in the introduction, in a typical portrait shot with a more open aperture we see a bokeh around the model and a blur in the background. Depending on the lens aperture, the blur shows up with no or a small effect near the focus (model) and increases (hyperfocally) with the distance from the model in all directions. E.g., if we have a full body shot of the model, we would see the asphalt around the models feet as sharp as the model itself, because it is in the same focal plane. But the sharpness decreases with the distance to the focal plane.
In order to model that depth-of-field gradient, we can create a so called depth map and nest it as a mask of a Gaussian blur effect (layer). A typical depth map can be found in every topographic relief map, where low height levels are shown in green (like grass) and with increasing height blend into brown (rock) and then white (summits). A depth map for rendering follows a gradient from black to white or mid-grey to white with several steps of grey tones in between, each representing a certain (relative) distance. A depth map can be easily painted on a layer added to the image:
Receipe: I painted the nearest zone (where the model would be positioned) in black, i.e the blur layer will be completely hidden by that area of the mask. For the very distant and infinite zone (horizon and sky) I painted in white, so that the blur will reveal at 100% there. Between the black and the white zone I introduced two more grey colours: the darker one covers the area right behind the black one and on top right, because they are still quite close to the camera, and beyond of them a lighter grey that builds the transition to the white area in far distance.
All we have to do now is to create an adjustment layer with Gaussian blur, convert our painted depth map layer into a mask layer and nest it in the blur layer.

To avoid a strong diffusion of edges, it is recommended to adjust a low intensity of blur and double the blur layer (including the depth map mask) several times instead of using only one blur layer with a strong blur effect.
The final image gives the impression of continuous change in depth of field. The bokeh effect also disguises the imprecise rendering of the AI-created image content and pretends a real existing environment.
The next step would be the overlay and partially masking of the model shot.

Alternative background modifications
The following gallery shows some more Dall-E 2 outputs and prompt variations perfectly blending with our original foreground (yet without bokeh simulation).
All chapters of the series "How AI-art Could Inspire Portrait Photography":


